Feeds:
Posts
Comments

Posts Tagged ‘C#.net’

This article is intended to provide basic concept and fundamentals of asp.net MVC (Model View Controller) architecture workflow for beginners.

Introduction:

“M” “V” “C” stands for “MODEL” “VIEW” “CONTROLLER” , asp.net MVC is an architecture to develop asp.net web applications in a different manner than the traditional asp.net web development , web applications developed with asp.net MVC is even more SEO (Search Engine Friendly ) friendly.

Developing asp.net MVC application requires Microsoft .net framework 3.5 or higher.

MVC interaction with browser:

Like a normal web server interaction, MVC application also accept request and respond web browser same way.

Inside MVC architecture:

Whole asp.net MVC architecture is based on Microsoft .net framework 3.5 and in addition uses LINQ to SQL Server.

What is a Model?

  1. MVC model is basically a C# or VB.net class
  2. A model is accessible by both controller and view
  3. A model can be used to pass data from Controller to view.
  4. A view can use model to display data in page.

What is a View?

  1. View is an ASPX page without having a code behind file
  2. All page specific HTML generation and formatting can be done inside view
  3. One can use Inline code (server tags ) to develop dynamic pages
  4. A request to view (ASPX page) can be made only from a controller’s action method

What is a Controller?

  1. Controller is basically a C# or VB.net class which inherits system.mvc.controller
  2. Controller is a heart of whole MVC architecture
  3. Inside Controller’s class action methods can be implemented which is responsible for responding to browser OR calling view’s.
  4. Controller can access and use model class to pass data to view’s
  5. Controller uses ViewData to pass any data to view

MVC file structure & file naming standards

MVC uses a standard directory structure and file naming standards which is very important part of MVC application development.

Inside the ROOT directory of the application there must be 3 directories each for model, view and Controller.

Apart from 3 directories there must have a Global.asax file in root folder. And a web.config like a traditional asp.net application.

  • Root [directory]
    • Controller [directory]
      • Controller CS files
    • Models [directory]
      • Model CS files
    • Views [directory]
      • View CS files
    • Global.asax
    • Web.config

Asp.net MVC Execution life cycle

Here is how MVC architecture executes the requests to browser and objects interactions with each other.

A step by step process is explained below: [Refer figure as given below]

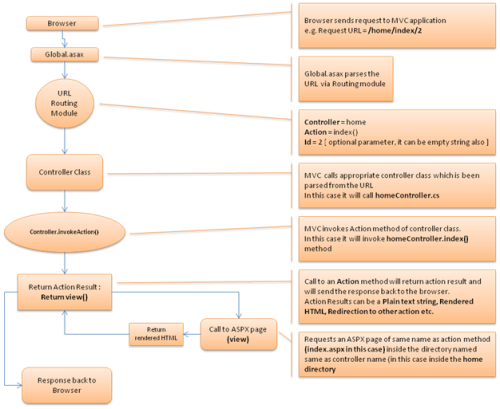
Step 1: Browser request

Browser request happens with a specific URL. Let’s assume that user entering URL like: [xyz.com]/home/index/

Step 2: Job of Global.asax – MVC routing

The specified URL will first get parsed via application_start() method inside Global.asax file. From the requested URL it will parse the Controller, Action and ID.

So for [xyz.com]/home/index/:

Controller = home

Action = index()

ID = empty — we have not specified ID in [xyz.com]/home/index/, so it will consider as empty string

Step 3: Controller and Action methods

MVC now find the home controller class in controller directory. A controller class contains different action methods,

There can be more than one action method, but MVC will only invokes the action method which is been parsed from the URL, its index() in our case.

So something like: homeController.index() will happen inside MVC controller class.

Invoking action method can return plain text string OR rendered HTML by using view.

Step 4: Call to View (ASPX page)

Invoking view will return view() . a call to view will access the particular ASPX page inside the view directory and generate the rendered HTML from the ASPX and will respond back to the browser.

In our case controller was home and action was index(). So calling view() will return a rendered HTML from the ASPX page located at /views/home/index.aspx.

This is it, the whole process ends here. So this is how MVC architecture works.

Read Full Post »

Being an asp.net developers we develop a web project and get it completed in a months of time as there are many organizations which works on very tight bound timeline for developing web sites Or web application projects. And delivers the project to client in months of time

While after project delivery if client come up saying that they are facing problems or application is giving errors, that time it always becomes a headache for a developer to test each things even whole project sometimes to find a smaller errors (by means of error here we are not talking about logical errors, we talking about exceptions which mostly responsible for errors in the application), there are many exceptions .net framework fires which we never come to find out while debugging or developing the application. Those exceptions never affect directly to the application but each small exception puts the unnecessary load on the server.

Here is the solution to track each and every smallest things happening inside your asp.net web application. Which I named as “Custom error tracking library

Custom error tracking library

Very first question will come is that, what is the core concept for this.

Concept is like we will be maintaining an XML file with a predefined structure which I have built which will contain all the required fields as nodes and subs. Which we call as errorlog.xml

There will be a CS library file which will track each and every minor errors/exceptions happens inside the application or .net framework and will put the error details inside the XML file.

Once we got CS library ready with us we just have to a simple function with 2 overload methods as per requirement in each try/catch blocks of the code and also in Application_Error event of Global.asax file.

XML File (errorlog.xml)

<?xml version=”1.0″ encoding=”utf-8″?>

<errorlog>

<error>

<datetime>datetime</datetime>

<filename>filename</filename>

<classname>classname</classname>

<methodname>methodname</methodname>

<errormethod>errormethod</errormethod>

<messsage>ErrorMessage</messsage>

<errordetails>Details goes here</errordetails>

<IP>IP adress</IP>

<url>URL</url>

</error>

<error>

</errorlog>

Root node of XLM file will be <errorlog></errorlog> inside root node there will be a sub node  <error></error> which will get duplicated for each error. For each error, library will generate a node will all the below listed details in XML file. Next to last error node. So for each error there will be a seaprate ERROR node.

Each fields of the above XML file is descibed beloe :

  1. 1. Datetime : date and time of the error/exception
  2. 2. File name : file name where exception or error happens
  3. 3. Class name : classname in which error occurred
  4. 4. Methodname : function name where errored
  5. 5. Errormethod : name of the function which contains error code.
  6. 6. Message : error message/exception message
  7. 7. Error details: detailed error description which will show whole stack trace of the functional execution.
  8. 8. IP : client IP address
  9. 9. URL : absolute error ULR

CS library

There will be a CS library file where we will write all functionality for error handling and writing errors into XML file.

errorHamdler.cs file will have 2 statis methods named WriteError(), there will be 2 overloaded methods for same functions with diff. parameters.

CS file will look as given below. We name it as errorHamdler.cs

errorHandler.cs

using System;

using System.Collections.Generic;

using System.Text;

using System.Xml;

using System.Reflection;

using System.Diagnostics;

namespace code_center

{

public class errorHandler

{

string _strErrorMessage, _strDetails, _strClassName, _strMethodName;

DateTime _dtOccuranceTime = new DateTime();

public errorHandler()

{

}

public errorHandler(DateTime time, string className, string methodName, string errorMessage, string details)

{

_dtOccuranceTime = time;

_strClassName = className;

_strDetails = details;

_strErrorMessage = errorMessage;

_strMethodName = methodName;

}

public static void WriteError(Exception ex)

{

WriteError(ex, “”);

}

public static void WriteError(Exception ex, string fileName)

{

XmlDocument doc = new XmlDocument();

string strRootPath = System.Configuration.ConfigurationManager.AppSettings[“logfilepath”].ToString();

string xmlPath = System.Web.HttpContext.Current.Server.MapPath(strRootPath);

doc.Load(@xmlPath);

XmlNode newXMLNode, oldXMLNode;

oldXMLNode = doc.ChildNodes[1].ChildNodes[0];

newXMLNode = oldXMLNode.CloneNode(true);

StackTrace stackTrace = new StackTrace();

StackFrame stackFrame = stackTrace.GetFrame(1);

MethodBase methodBase = stackFrame.GetMethod();

newXMLNode.ChildNodes[0].InnerText = DateTime.Now.ToString();

newXMLNode.ChildNodes[1].InnerText = fileName;

newXMLNode.ChildNodes[2].InnerText = methodBase.DeclaringType.FullName;

newXMLNode.ChildNodes[3].InnerText = methodBase.Name;

newXMLNode.ChildNodes[4].InnerText = ex.TargetSite.Name;

newXMLNode.ChildNodes[5].InnerText = ex.Message;

newXMLNode.ChildNodes[6].InnerText = ex.StackTrace;

newXMLNode.ChildNodes[7].InnerText = System.Web.HttpContext.Current.Request.UserHostAddress;

newXMLNode.ChildNodes[8].InnerText = System.Web.HttpContext.Current.Request.Url.OriginalString;

doc.ChildNodes[1].AppendChild(newXMLNode);

doc.Save(@xmlPath);

doc.RemoveAll();

}

}

}

In above code there is a line “string strRootPath = System.Configuration.ConfigurationManager.AppSettings[“logfilepath”].ToString();”

We need to give XML file path also where we have placed XML file in the project, so just have to add 1 line in web.config file as given below to store actual XML file path, which will be used in abiove functon.

Code inside web.config

<appSettings>

<add key=”logfilepath” value=”~/errorHandling/errorlog.xml”/>

</appSettings>

How to use error handler in application

Now everything is ready to be used in real time application. In each try/catch block we have to call

Writeerror() function as described below .

Code inside Default.aspx.vb

protected void Page_Load(object sender, EventArgs e)

{

try

{

throw new Exception(“Custom error”);

}

catch (Exception ex)

{

Response.Write(ex.Message);

code_center.errorHandler.WriteError(ex, “Default.aspx.vb”);

}

}

Apart from each try/catch blocks we will put some code in Global.asax file also, as given below.

void Application_Error(object sender, EventArgs e)

{

code_center.errorHandler.WriteError(Server.GetLastError().GetBaseException(), “Global.asax”);

}

The reason behin putting code in Global.asax file is very important and necessory as there might be many exceptions which occurs at application level and canot be tracable in any try/catch blocks in any function or events. So anyerror except try/catch blocks will come in this event (Application_Error) and will get inserted intoXML file.

That’s it, we have done with the error handling, and all errors will be tractable from the XML file which is being generated via the error handler.

Read Full Post »

We are all familiar with AD rotator control asp.net provides to show rotating/random ads on every page refresh.

But I found a limitation of this control while I needed to develop functionality where AD banners get changed on every page refresh as well as each banners should have multiple links which navigates to diff. URLs ( multiple image mapping in each AD banners )

As this is not possible with AD rotator I have developed a custom asp.net control which provides all this flexibilities with all AD rotator features.

Basic Concept:

To make the control easy to use & understand we will be keeping the concept of defining Ads same like AD rotator control using XML file.

Control will read the Ad banners from the XML file and render all the details with multiple image mappings in the aspx page.

XML file structure:

First and foremost step is to finalize the XML file structure that to be used in custom control to render the ads on random bases.

XML file will look as given in below sample file.

bannes.xml

<?xml version=”1.0″ encoding=”utf-8″ ?>

<banbers>

<banner>

<ImageUrl>http://xyz.com/banner1.jpg</ImageUrl&gt;

<AlternateText>Site1 Main</AlternateText>

<mappings>

<map>

<left>0</left>

<top>0</top>

<right>50</right>

<bottom>50</bottom>

<navigateUrl>google.com</navigateUrl>

</map>

</mappings>

</banner>

<banner>

<ImageUrl>banners/5.jpg</ImageUrl>

<AlternateText>b5</AlternateText>

<mappings>

<map>

<left>10</left>

<top>10</top>

<right>10</right>

<bottom>10</bottom>

<navigateUrl>google.com</navigateUrl>

</map>

<map>

<left>25</left>

<top>25</top>

<right>25</right>

<bottom>25</bottom>

<navigateUrl>google.com</navigateUrl>

</map>

<map>

<left>10</left>

<top>10</top>

<right>10</right>

<bottom>10</bottom>

<navigateUrl>google.com</navigateUrl>

</map>

<map>

<left>25</left>

<top>25</top>

<right>25</right>

<bottom>25</bottom>

<navigateUrl>google.com</navigateUrl>

</map>

<map>

<left>10</left>

<top>10</top>

<right>10</right>

<bottom>10</bottom>

<navigateUrl>google.com</navigateUrl>

</map>

<map>

<left>25</left>

<top>25</top>

<right>25</right>

<bottom>25</bottom>

<navigateUrl>google.com</navigateUrl>

</map>

</mappings>

</banner>

</banbers>

Inside main banners TAG there will be multiple banners TAG to be added for each AD banner,

Each banner TAG will have child nodes(attributes) as listed below:

  1. Image URL – AD image URL to be specified here
  2. Alternate text – alt attribute for image
  3. Mappings  – list of all mappings with relative  left-right-top-Bottom attributes
    1. Left – left side relative axis
    2. Right – right side relative axis
    3. Top– Top relative axis
    4. Bottom– Bottom relative axis
    5. Navigate URL – URL to navigate

Developing Custom Control:

Now next step is to build a custom asp.net control which will read the above XML structure and renders the data accordingly on ASPX page.

C# code file will be as given below:

ad-banners.cs

this control will have 1 public property where the XML file path will be given called

using System;

using System.Collections.Generic;

using System.ComponentModel;

using System.Text;

using System.Web;

using System.Web.UI;

using System.Web.UI.WebControls;

using System.Xml;

namespace InfoquestLibrary.Controls

{

[DefaultProperty(“Text”)]

[ToolboxData(“<{0}:banner runat=server />”)]

public class banner : System.Web.UI.WebControls.WebControl

{

string _strImageURL, _strXMLpath;

[Bindable(true)]

[Category(“Appearance”)]

[DefaultValue(“”)]

[Localizable(true)]

public string ImageURL

{

get { return _strImageURL; }

set { _strImageURL = value; }

}

public string XMLpath

{

get { return _strXMLpath; }

set { _strXMLpath = value; }

}

public override void RenderBeginTag(HtmlTextWriter writer)

{

}

public override void RenderEndTag(HtmlTextWriter writer)

{

}

protected override void RenderContents(HtmlTextWriter output)

{

XmlDocument xDoc = new XmlDocument();

XmlNode xRandomNode;

bool useMapping = true;

int xIntRandomNumber;

Random r = new Random();

xDoc.Load(System.Web.HttpContext.Current.Server.MapPath(this.XMLpath));

xIntRandomNumber = r.Next(xDoc.ChildNodes[1].ChildNodes.Count);

xRandomNode = xDoc.ChildNodes[1].ChildNodes[xIntRandomNumber];

if (xRandomNode.ChildNodes[2].Equals(null))

{

useMapping = false;

}

else

{

if (xRandomNode.ChildNodes[2].ChildNodes.Count == 0)

useMapping = false;

}

if (xRandomNode.HasChildNodes)

{

this.ImageURL = xRandomNode.ChildNodes[0].InnerText;

}

output.AddAttribute(HtmlTextWriterAttribute.Src, this.ImageURL);

if (useMapping)

{

output.AddAttribute(HtmlTextWriterAttribute.Usemap, “#map” + this.ID);

}

output.AddAttribute(HtmlTextWriterAttribute.Border, “none”);

this.AddAttributesToRender(output);

output.RenderBeginTag(HtmlTextWriterTag.Img);

if (useMapping)

{

int xIntMaps, xIntCounter;

xIntMaps = xRandomNode.ChildNodes[2].ChildNodes.Count;

output.AddAttribute(HtmlTextWriterAttribute.Name, “map” + this.ID);

output.AddAttribute(HtmlTextWriterAttribute.Id, “map” + this.ID);

this.AddAttributesToRender(output);

output.RenderBeginTag(HtmlTextWriterTag.Map);

for (xIntCounter = 0; xIntCounter < xIntMaps; xIntCounter++)

{

XmlNode xMap = xRandomNode.ChildNodes[2].ChildNodes[xIntCounter];

if (xMap.HasChildNodes)

{

output.AddAttribute(HtmlTextWriterAttribute.Shape, “rect”);

output.AddAttribute(HtmlTextWriterAttribute.Coords, xMap.ChildNodes[0].InnerText + “,” + xMap.ChildNodes[1].InnerText + “,” + xMap.ChildNodes[2].InnerText + “,” + xMap.ChildNodes[3].InnerText);

output.AddAttribute(HtmlTextWriterAttribute.Href, xMap.ChildNodes[4].InnerText);

output.AddAttribute(HtmlTextWriterAttribute.Title, “”);

output.AddAttribute(HtmlTextWriterAttribute.Alt, “”);

output.RenderBeginTag(HtmlTextWriterTag.Area);

output.RenderEndTag();

}

}

output.RenderEndTag();

}

}

protected override void OnPreRender(EventArgs e)

{

}

}

}

Using customer control in ASPX page:

Now we are done with developing customer control with all the required functionality.

And control now ready for use.

Registering custom control

<%@ Register Assembly=”code_center_library” TagPrefix=”TCC” Namespace=”TCC.Controls” %>

Defining Custom control in ASPX page

<TCC:banner ID=”ads” runat=”server” XMLpath=”~/banner-mapping/bannes.xml” />

Read Full Post »


APSX page :
<form id=”form1″ runat=”server”>
<div style=”padding: 200px;”>
<asp:Image ID=”imagebox” runat=”server” ImageUrl=”~/sql-image-store/image-handler.ashx” />
</div>
</form>


Handler code: image-handler.ashx

<%@ WebHandler Language=”C#” Class=”image_handler” %>

using System;

using System.Web;

using System.IO;

using System.Data;

using System.Data.Sql;

using System.Data.SqlClient;

using System.Configuration;

public class image_handler : IHttpHandler

{

public void ProcessRequest(HttpContext context)

{

string xStrCon = System.Configuration.ConfigurationManager.ConnectionStrings[“conStrImage”].ConnectionString;

SqlConnection xCon = new SqlConnection(xStrCon);

xCon.Open();

SqlCommand xCom = new SqlCommand(“select * from images where”, xCon);

SqlDataAdapter xAda = new SqlDataAdapter(xCom);

DataSet ds = new DataSet();

xAda.Fill(ds);

// Image processing starts

byte[] bytImage = ReadFile(context.Server.MapPath(“banner.JPG”));

xCom.CommandText = “insert into images values(2,’kensington’,@imagedata)”;

xCom.Parameters.Add(new SqlParameter(“@imagedata”, (object)bytImage));

xCon.Close();

//Display image from SQL server

byte[] imageData = (byte[])ds.Tables[0].Rows[0][2];

context.Response.Clear();

context.Response.ContentType = “image/JPEG”;

context.Response.OutputStream.Write(imageData, 0, imageData.Length);

}

byte[] ReadFile(string sPath)

{

//Initialize byte array with a null value initially.

byte[] data = null;

//Use FileInfo object to get file size.

FileInfo fInfo = new FileInfo(sPath);

long numBytes = fInfo.Length;

//Open FileStream to read file

FileStream fStream = new FileStream(sPath, FileMode.Open, FileAccess.Read);

//Use BinaryReader to read file stream into byte array.

BinaryReader br = new BinaryReader(fStream);

//When you use BinaryReader, you need to supply number of bytes to read from file.

//In this case we want to read entire file. So supplying total number of bytes.

data = br.ReadBytes((int)numBytes);

return data;

}

public bool IsReusable

{

get

{

return false;

}

}

}

Read Full Post »